Monday, November 2, 2009

Understanding Oracle BI Application(OBIApps) methodology of deriving AGO Measures

Very often I have members from the IT team at Customer site asking me the question on how to customize OBIApps in order to derive Ago(Year,Quarter,Month,Day) Measures, which are not delivered Out of the Box(OOTB) .Of course there is a Time series function(AGO) in OBIEE which can be leveraged to fulfill these requirements , but in this article I would like to explain the OOTB approach that is taken to derive AGO measures. Getting familiar with OOTB approach and the underlying Data Model that is there to support similar requirements, can help us follow similar methodology for our customization.

In this article I have takenOracle BI Application 7.9.6>Human Resources>Workforce Profile Subject area as an example for understanding the Concepts.

1.Below is the Screnshot of the OOTB Human Resources>Workforce Profile Subject Area .

2. Building a quick report with the Metrics above displays the results as below .

Note that Prior Period Headcount for 2006 is equivalent to Headcount value of 2005.

3. Let us now look into the design . Open the OOTB RPD and expand the Human Resource - Workforce Profile Presentation Catalog. Scroll Down and further expand the Presentation Table Workforce Profile Facts you should notice the two Presentation Columns Headcount and Prior Period Headcount .

4. These two Presentation columns are mapped to different Logical Table Sources as listed below
Fact_W_WRKFC_EVT_MONTH_F_Snapshot_Year
Fact_W_WRKFC_EVT_MONTH_F_Snapshot_Year_Ago
Fact_W_WRKFC_EVT_MONTH_F_Snapshot_Quarter
Fact_W_WRKFC_EVT_MONTH_F_Snapshot_Quarter_Ago
Fact_W_WRKFC_EVT_MONTH_F_Snapshot_Month
Fact_W_WRKFC_EVT_MONTH_F_Snapshot_Month_Ago
Fact_W_WRKFC_EVT_MONTH_F_Snapshot_Day
Fact_W_WRKFC_EVT_MONTH_F_Snapshot_Day_Ago


5.Further drilling down into the Physical Layer reveals that the above logial table sources are derived from the two Physical Table Aliases of the same table W_WRKFC_EVT_MONTH_F.

6.Below is the Physical Diagragm of the alias Fact_W_WRKFC_EVT_MONTH_F_Snapshot joinining with the Time Dimensions.

7.Below is the expression definition used in the join criteria . Note that ROW_WID of Year,Quarter,Month and Day Dimensions are used to join with the Fact table alias.

8.Below is the Physical diagram of the alias Fact_W_WRKFC_EVT_MONTH_F_Snapshot_Period_Ago joining with the Time Dimensions.

9.Below is the expression definition used in the join criteria . Note that YEAR_AGO_WID,QUARTER_AGO_WID,MONTH_AGO_WID and DAY_AGO_WID are used to join with the Time Dimensions.

10.Let us now analyze the Data of the Time Dimension. As you can notice below the Data Model is in place which can be used to join and derive AGO measures.

11.Similar approach can be followed during Oracle BI Application(OBIApps) Customization for deriving ago measures which are not present Out of the Box(OOTB).

Configuring OBIEE Proxy(Act As) Functionality

As an OBIEE Developer we always want to be able to login as the Business Users in order to validate the security development. This can be done without the need to know the Business user's logon credentials by simply configuring the 'Act As' feature in OBIEE.
Below are the steps involved in enabling this feature.
1.The Script below will create a Proxy table and insert three records so that the developer 'shiv' can login(proxy) as 'business_user1' and 'business_user2' and validate the security requirement is as expected.Also the 'Administrator' can proxy the user 'shiv'.


CREATE TABLE OBIEE_ACT_AS_USERS
(PROXY_ID VARCHAR2(50),
TARGET_ID VARCHAR2(50),
PROXY_LEVEL VARCHAR2(50));
INSERT INTO OBIEE_ACT_AS_USERS(PROXY_ID,TARGET_ID,PROXY_LEVEL) VALUES('Administrator','shiv','full');
INSERT INTO OBIEE_ACT_AS_USERS(PROXY_ID,TARGET_ID,PROXY_LEVEL) VALUES('shiv','business_user1','full');
INSERT INTO OBIEE_ACT_AS_USERS(PROXY_ID,TARGET_ID,PROXY_LEVEL) VALUES('shiv','business_user2','full');
COMMIT;


2.Import the table OBIEE_ACT_AS_USERS into the Physical Layer and Name the Database and Connection Pool as Act_As_Users , CP_Act_As_Users.

3. We now need to create three Session Initialization Blocks Set_RUNAS(Variable:RUNAS),ProxyLevel(Variable:PROXYLEVEL) and ProxyBlock(Variable:PROXY).

4.Initialization Block:Set_RUNAS
Default Initialization String:
Select 'dummy' from dual


5.Initialization Block:ProxyBlock
Default Initialization String:
Seleselect target_id from obiee_act_as_users where 'VALUEOF(NQ_SESSION.RUNAS)'=target_id and ':USER'=proxy_Id


6.Initialization Block:ProxyLevel
Default Initialization String:
select proxy_level from obiee_act_as_users where 'VALUEOF(NQ_SESSION.RUNAS)'=target_id and ':USER'=proxy_Id


7.Navigate to /OracleBIData/web/config/ and modify the file instanceconfig.xml to add the below tag before the </ServerInstance>

<LogonParam>
<TemplateMessageName>Act_As_Logon_Template</TemplateMessageName>
<MaxValues>100</MaxValues>
</LogonParam>


8.Navigate to /OracleBI/web/msgdb/customMessages/ and create a new XML file Act_As_Logon_Template.xml containing the below script.

<?xml version="1.0" encoding="utf-8" ?>
<WebMessageTables xmlns:sawm="com.siebel.analytics.web.messageSystem">
<WebMessageTable system="SecurityTemplates" table="Messages">
<WebMessage name="Act_As_Logon_Template">
<XML>
<logonParam name="RUNAS">
<getValues>EXECUTE PHYSICAL CONNECTION POOL Act_As_Users.CP_Act_As_Users select target_Id from OBIEE_ACT_AS_USERS where proxy_Id='@{USERID}'</getValues>
<verifyValue>EXECUTE PHYSICAL CONNECTION POOL Act_As_Users.CP_Act_As_Users select target_Id from OBIEE_ACT_AS_USERS where proxy_Id ='@{USERID}' and target_Id='@{VALUE}'</verifyValue>
<getDelegateUsers>EXECUTE PHYSICAL CONNECTION POOL
Act_As_Users.CP_Act_As_Users select proxy_Id, proxy_Level from OBIEE_ACT_AS_USERS where target_Id ='@{USERID}'</getDelegateUsers>
</logonParam>
</XML>
</WebMessage>
</WebMessageTable>
</WebMessageTables>


9. Within OBIEE Security add three new Users 'shiv','business_user1' and 'business_user2' as shown below.

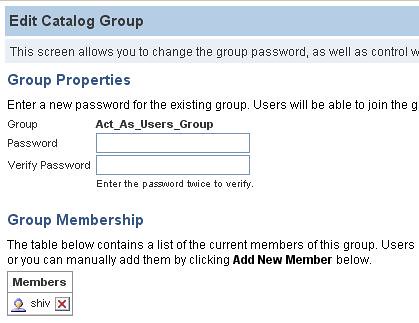
10.Create a new Web group Act_As_Users_Group and add the user 'shiv' to this group.

11.Cotinue to be logged on as an Administrator and Navigate to Settings>Administration>Manage Privileges and add 'Act_As_Users_Group to Proxy .

12. Restart the Oracle BI Server and Oracle BI Presentation Server.

13. Login in as 'shiv' and then navigate to settings>Act as>business_user1